
Wanderlog Review: How I Plan Family Trips With Less Stress
If you feel analysis paralysis every time you start to plan a trip and everyone keeps asking, “So what’s the plan?” and you don’t have an answer, you’re in the right place. This Wanderlog review is based on how I actually plan family trips as a mom of three. I’ve used Wanderlog for several years to organize everything from quick road trips close to home to multi-day international vacations, and it’s also the tool I rely on when building custom itineraries for other families. What I love most is that it helps me build a realistic plan I can actually follow and adjust when traveling with kids. In this review, I’ll walk you through the features that matter most when traveling as a family and what to know before you decide whether Wanderlog is right for you.
What is Wanderlog
Wanderlog is a digital itinerary app that you can use on both Android and Apple devices, as well as on a desktop. It provides an all-in-one solution to compiling your reservations, itinerary stops, schedule, and budget.
I like travel planning, but I don’t want it to become a second job. (Actually, I did make it a second job…but by choice!) Wanderlog is one of the few tools that genuinely lowers my stress because it helps me answer the questions that come up mid-trip: Where are we going next, how long will it take, and what’s our backup plan?
Because I also build itineraries for other families, I need something flexible and hard to mess up. Wanderlog checks both boxes.
The Best Features of Wanderlog for Family Travel
Wanderlog is easy to get started with: create a trip, add your destination and dates, then start dropping in ideas, reservations, and notes. If you’ve used Google Maps or any planning app before, the basics will feel intuitive. I’ll walk through how I actually use those features for family travel below.
Wanderlog rolls out changes occasionally, but the core planning flow hasn’t changed since I started using it in 2023.
Gather and organize all your ideas
Why it matters for families: Helps you get to what’s most important
I don’t start my trip planning with a perfect itinerary. I start with a brain dump.
Once I’ve picked a destination, I open a new trip in Wanderlog and toss in everything we might want to see: parks, museums, playgrounds, donut shops, that one weird roadside stop my kids beg for (okay, it’s actually me).
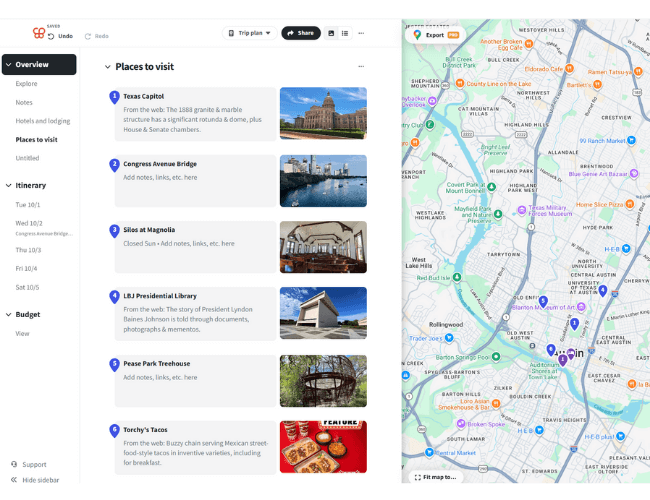
The reason it works for family travel is simple: it keeps the plan visual. When you’re traveling with kids, time and distance matter. A “quick stop” that’s actually a 35-minute drive across town can wreck your whole afternoon.
By adding all the potential stops, I can quickly visualize distance with the integrated map feature and make smart decisions when deciding what to keep and what to skip in my itinerary.
When brainstorming, my flow is usually:
- Save the places I’ve already had on my mind. (Think Eiffel Tower and Notre Dame in Paris).
- Next, search through Wanderlog’s suggestions and explore tab (it’s a fast way to spot the popular attractions).
- Add my own finds from blog searches and paste notes and links directly into the stop (so I’m not hunting later).
- Finally, get family input. Each kid and adult picks one “must-do.” One. It keeps expectations realistic and cuts down on whining later. Can we add more? YES! But one thing to look forward to helps everyone have some buy-in.
Once the list is in, I refer to the map view and start dragging stops into days. This is the part that saves me. I can see what naturally clusters together and plan a daily schedule that is balanced and won’t push us all to our breaking point.
For example, when planning a trip between Little Rock and St. Louis, I was able to see what side quests would make sense for our family (Elephant Rocks) and what didn’t (Branson, MO). The same strategy works for planning activities in big cities like NYC or when choosing which hikes to tackle in Glacier National Park.
Easy Sharing with Family and Friends
Why it matters for families: Get everyone on the same page.
You can easily add any other travelers to a Wanderlog trip with just one link. People can add stops and notes in one place, so we can collaborate wherever we are, and no one is left in the dark. Use this when planning a family reunion trip or traveling with your best friends.
As tripmates are added, you can also split the costs and keep track of who is paying for what. That way, you can settle up at the end of the trip and not have to scroll through all your bank statements or receipts. This is perfect for families that are traveling together.
I used this on a recent trip to Merida, Mexico, with some old college roommates, and it was so easy to just add the taxi ride, dinner cost, or excursion tip I paid for. I could even put it in the local currency, and Wanderlog calculated the total cost (in USD) that each person owed. It was easy to settle up once the trip was over, and we don’t have any IOUs hanging over our heads.
Adjust your itinerary easily
Why it matters for families: Quickly pivot and try a different schedule without the stress.
When I am working on a schedule for a trip, I rarely get it right the first go around. Being able to move activities between different dates easily is a lifesaver. Here’s how I do it:
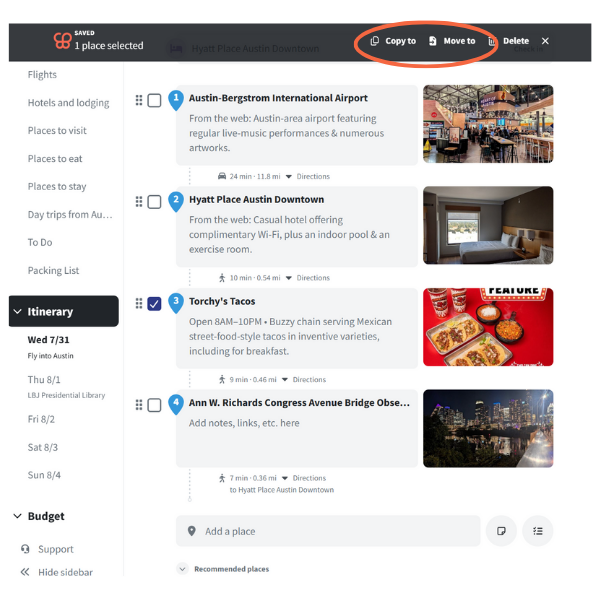
- Add all my activities into a general list (You can have multiple lists broken down by specific location or activity type).
- Select the box next to the activity and “Copy to” a specific date. You can also drag and drop the item. I chose “copy to” over “move to” because I like keeping my list intact even after an activity has been assigned to a day.
- You can re-order the activities on any given day by dragging and dropping them into a different order.
- If your schedule changes, you can select the activity, select “move to,” and assign it to a different date.
Being able to move around activities will save you time and reduce stress throughout the planning process.
Budget tracking for accountability
Why it matters for families: Stay on top of your budget and make it work for you.
Wanderlog makes it very easy to keep track of your budget so you can quickly reference it before, during, and after your trip. I am a big supporter of creating a realistic budget, and it couldn’t be easier with Wanderlog.
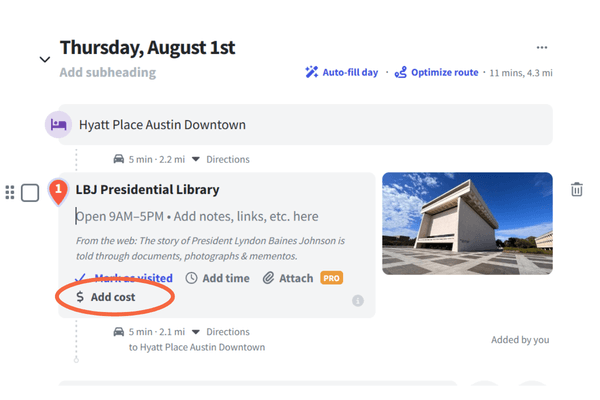
You can directly link a cost to a planned activity, which will then be auto-added to the overall trip budget. This helps you see the bigger picture and gauge if a specific activity will be worth the cost.
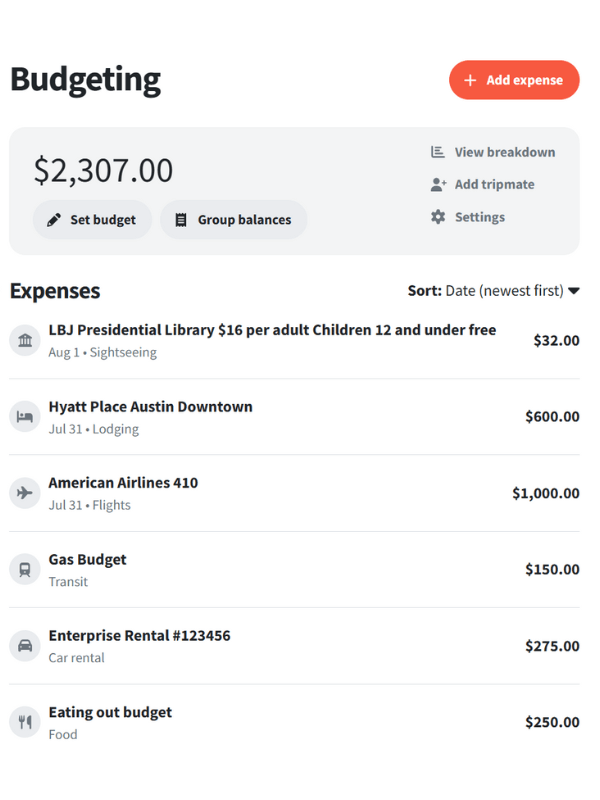
If you are unsure of exactly what you will spend in certain categories, you can add the category to the budget and just estimate the costs. Once you start booking or making purchases on your trip, you can edit it in real time and stay on top of your spending.
As mentioned earlier, you can also split costs and keep track of who has paid for what. Easy peasy!
What Can Be Frustrating (And How I Work Around It)
Wanderlog makes it easy to over-plan. You can keep adding and adding to your “must see” list until you’re suddenly rethinking the entire trip.
But there is a simple fix: Create a Must-Do list and a separate “Could Do” list. Be judicious in what you place in each category, but when planning the daily schedule, always start with the must-dos. If naps run long or lunch takes forever (because of course it does), you know what matters most.
There’s also a learning curve. The first time you use it, give yourself 15 minutes to click around and get the feel of it. After that, it’s pretty quick (and a little addictive).
And yes, you’ll want internet for most features, so if you are traveling to remote areas it can be frustrating. When I know we’ll have spotty service, I screenshot the key days and copy critical info (like confirmation numbers) into a separate notes app or even print them out. It’s not fancy, but it works.
Do You Need Wanderlog Premium? My Honest Take
Most families don’t need Premium. I say that as someone who loves the app and recommends it constantly.
I have used the free version for all but one of our trips. For normal road trips, weekend city breaks, and anything where we’ll have a decent signal, the free version is plenty. I’d rather put that money toward snacks, parking, or an extra activity.
When the Free Version Is More Than Enough
The free version works great when you want to:
- Add places and organize them by day
- Keep notes for each stop
- Share a trip link with your group
- Track a basic budget
I have had no trouble accessing what I need using data and e-sims most of the time, but when visiting more rural areas like the national parks, I don’t count on access. The free version still works fine if I prepare ahead and print out what I need or take a screenshot.
When I’d Pay for Premium (And Why I Sometimes Do)
I would recommend Premium when you know you’ll be offline a lot, or when you want everything stored in one place, including documents. While you can upload basic confirmation information for most reservations, adding attachments is a premium feature.
For example, I paid for Premium on a trip to Norway and Switzerland because I was nervous about internet access (which ended up not being a problem at all), and I could attach any PDFs or documents I needed. In a place so far from home, and going abroad for the first time in 10 years, the ability to access plans without signal brought a lot of peace of mind.
Is Wanderlog Worth It?
Wanderlog is my number one recommended travel planning app because it gives me one place to collect ideas, build a flexible itinerary, and share it with the people who actually need to see it. The free version is usually all you need, and it’s a low-risk way to get your next trip organized.
Ready to try it? Start your next weekend trip in Wanderlog and see how easy it is to build a plan your whole crew can follow. Once it clicks, you’ll wonder how you ever planned without Wanderlog.
If you want help turning your ideas into a realistic Wanderlog itinerary your family will actually enjoy, you can book a travel consultation with me. Let me help you figure out the best accommodations, schedule, and more for your next trip.
Happy travels!